Adding an Email Account: Your Expert Guide for 2026
December 30, 2025
Are you struggling with adding an email account in 2026? You are not alone. Email is still the backbone of digital communication, but new features and security measures can make setup confusing.
This expert guide makes adding an email account simple. You will learn the most current methods for every device, how to troubleshoot common issues, and how to keep your accounts secure.
We will also show you how to integrate your email with productivity tools for maximum efficiency. Get ready to connect quickly, protect your data, and stay organised with our step-by-step approach.
Understanding Email Account Types in 2026
Choosing the right email account type is the first step towards successfully adding an email account. With new features and providers emerging in 2026, understanding these options will help you connect faster and more securely.
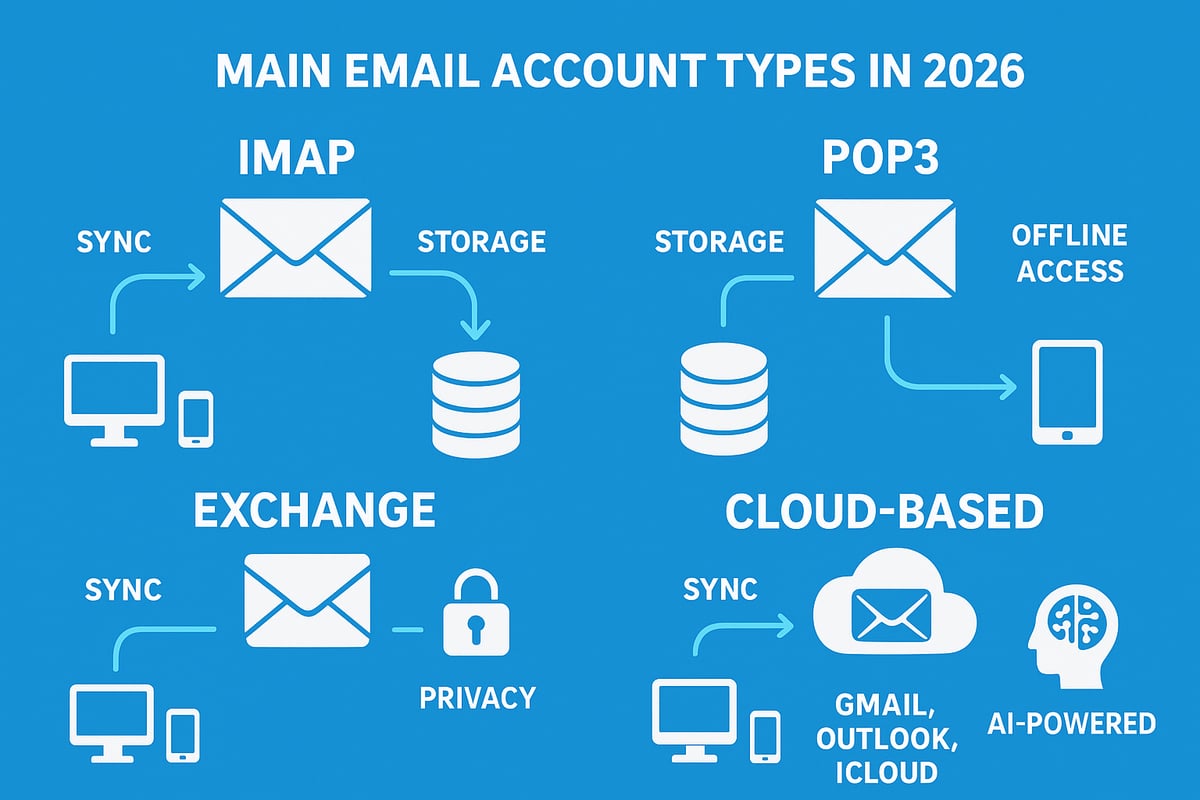
What Are the Main Email Account Types?
When adding an email account, you will encounter several main types:
- IMAP (Internet Message Access Protocol): Stores messages on the server, syncs across devices, ideal for people using multiple devices.
- POP3 (Post Office Protocol): Downloads emails to your device, removing them from the server, best for single-device access.
- Exchange: Microsoft’s business-focused service, offering real-time sync of mail, contacts, calendars, and tasks.
- Cloud-Based Services: Gmail, Outlook.com, and iCloud provide seamless access, AI features, and robust security, all managed in the cloud.
Each type affects how you experience adding an email account, especially regarding syncing and storage.
Comparing Email Account Types in 2026
Let’s break down the differences between these account types using a table:
| Feature | IMAP | POP3 | Exchange | Cloud-Based |
|---|---|---|---|---|
| Storage | Server | Local device | Server | Cloud |
| Sync Across Devices | Yes | No | Yes | Yes |
| Offline Access | Limited | Full | Partial | Partial |
| Device Compatibility | High | High | High | Very High |
| AI Features | Limited | None | Growing | Advanced |
| Privacy Controls | Moderate | High (local) | Advanced | High |
When adding an email account, these differences define your experience and future flexibility.
Trends Shaping Email in 2026
The landscape of adding an email account is changing rapidly. Privacy-focused providers are on the rise, offering better encryption and user control. AI-powered inboxes are now mainstream, automatically sorting messages, flagging spam, and even suggesting replies.
In 2025, over 4.5 billion people used email globally, and 82% of them preferred cloud-based accounts, according to Statista. This shift reflects growing trust in cloud reliability and the desire for features like smart categorisation and seamless sync.
AI is also helping to combat sophisticated phishing attacks, making security even more critical when adding an email account.
Example: Gmail vs POP3 in Practice
Consider adding an email account with Gmail versus a traditional POP3 provider:
- Gmail: Cloud-based, syncs instantly across devices, offers AI-powered sorting and search, and supports two-factor authentication.
- POP3: Downloads messages to one device, lacks advanced sync, and often requires manual backup.
If you need to access messages from multiple devices or want AI assistance, adding an email account with Gmail provides a superior experience. POP3 may suit those preferring local storage and offline access.
Security Considerations by Account Type
Security is a crucial factor when adding an email account. Cloud-based and Exchange accounts offer built-in encryption and regular backups, while IMAP provides decent server-side protection.
POP3, however, stores data locally, making it vital to maintain device security and manual backups. New privacy-focused providers in 2026 offer end-to-end encryption, giving users more control over their data.
Always enable two-factor authentication and review your provider’s privacy policies before adding an email account.
How to Choose the Right Email Account Type
When adding an email account, consider your needs:
- Individuals: Cloud-based accounts for flexibility, AI, and sync.
- Small Businesses: Exchange or custom domains for professional features.
- Enterprises: Hybrid solutions for compliance and control.
Unified inboxes are a major trend in 2026, letting users manage all accounts in one place for maximum productivity. For strategies on managing multiple inboxes, see All email accounts in one place.
Understanding these choices ensures adding an email account is efficient, secure, and future-proof.
Preparing to Add an Email Account: Essentials for a Smooth Setup
Setting yourself up for success begins before you even start adding an email account. Preparation is key, whether you are configuring a personal inbox or managing a new work address. Begin by collecting the basics: your email address, password, and any required server settings such as incoming and outgoing mail server names. If you are starting from scratch, resources like Get a free email account can guide you through the process of creating and preparing your first address.
What You Need Before Adding an Email Account
Before adding an email account, ensure you have all necessary credentials and technical details. This includes not just the email address and password, but also information about incoming (IMAP or POP3) and outgoing (SMTP) servers. Some providers may require specific port numbers or authentication methods.
You can usually find these details in your provider’s documentation, through IT support, or via automated setup tools built into modern devices. Having this information ready prevents delays and reduces the risk of errors during setup.
Device Readiness and Locating Setup Information
Check that your device meets the software requirements for adding an email account. For mobile phones, tablets, or PCs, ensure your operating system and email app are up to date. Outdated software can cause compatibility issues or limit access to advanced features.
Locate your provider’s setup instructions, as these often include step-by-step guides tailored to specific platforms. If you are using a managed business account, IT support may provide configuration profiles or automated setup links. Always follow the most current guidance to ensure a smooth process.
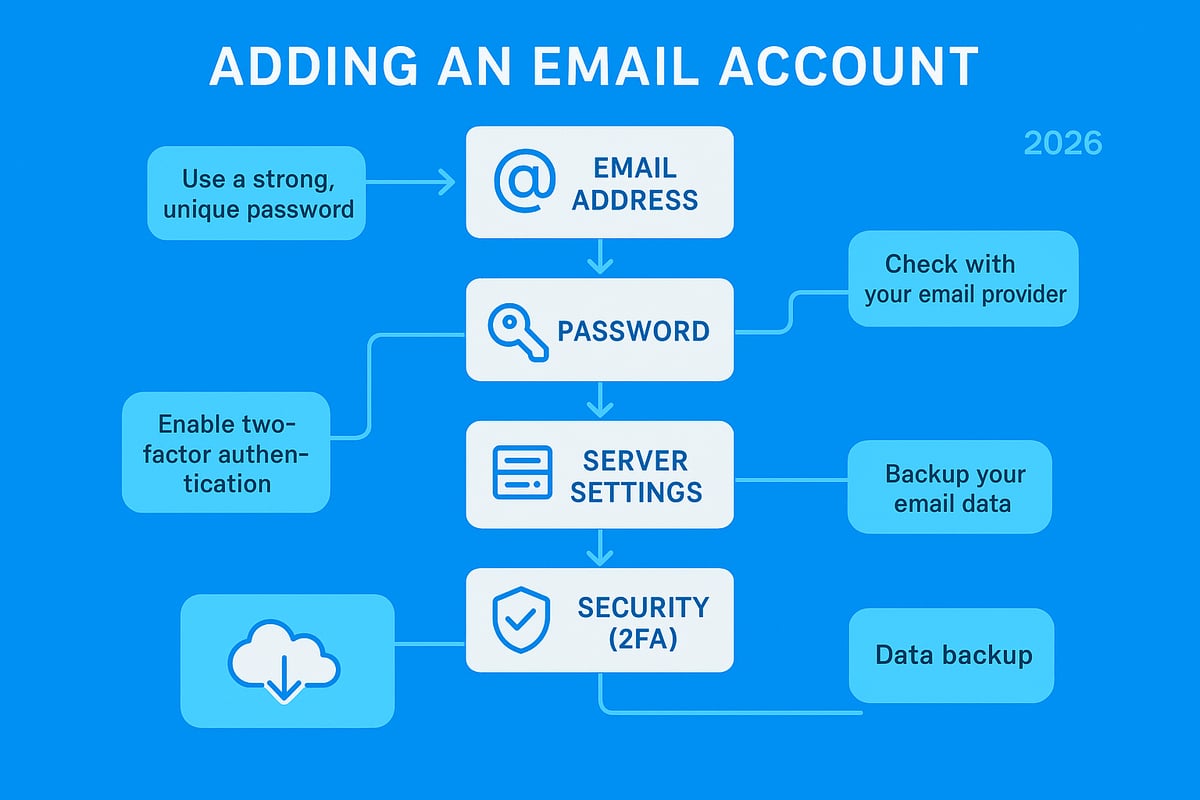
Security Steps and Data Backup
Security should never be an afterthought when adding an email account. Enable two-factor authentication (2FA) wherever possible, as this adds a crucial layer of protection against unauthorised access. Use strong, unique passwords for each account, and consider a password manager to keep them secure.
Before making any changes, back up your existing data. This is especially important if you are migrating from another account or device. Backups protect your emails, contacts, and calendar entries from accidental loss, making transitions seamless and stress-free.
Avoiding Pitfalls and Ensuring Accessibility
Common mistakes during setup include typos in credentials, using outdated apps, or selecting unsupported protocols. Double-check each entry for accuracy. If you encounter issues, verify server settings or consult your provider’s help resources.
To maximise accessibility, plan for synchronisation across all your devices. Adding an email account with the right settings ensures that messages, contacts, and calendars stay updated whether you are at your desk, on your phone, or working remotely. This preparation not only streamlines your workflow but also minimises disruptions in your communication.
Step-by-Step Guide: Adding an Email Account on Popular Platforms
Getting started with adding an email account can seem overwhelming, but it is straightforward when you follow the right process for your device. This guide will walk you through each major platform, ensuring your setup is secure, efficient, and tailored to your needs.
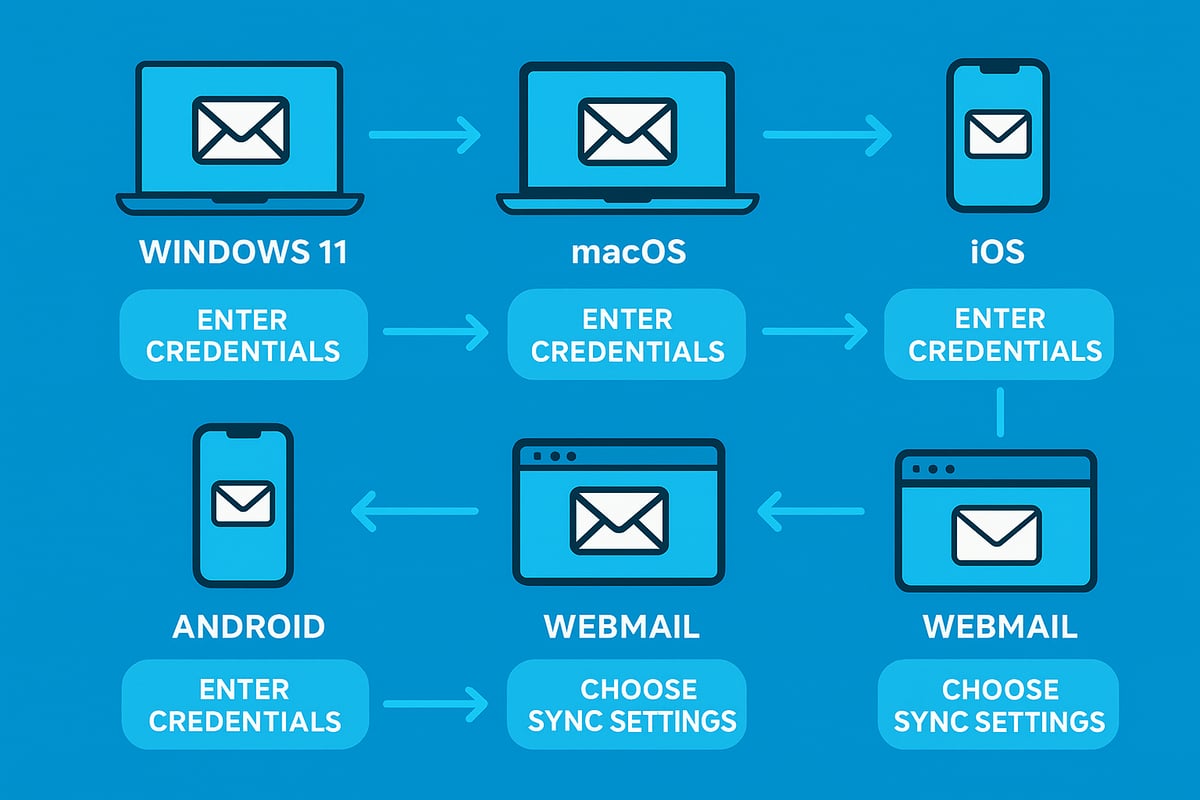
Adding an Email Account on Windows 11
To begin adding an email account on Windows 11, open the built-in Mail app or Microsoft Outlook. Select “Add account” from the main menu. You will be prompted to choose your provider or opt for a manual setup if your provider is not listed.
Enter your email address and follow the on-screen prompts. If the app recognises your provider, it will auto-fill most settings, making adding an email account quick and hassle-free. If not, input the incoming and outgoing server details, such as IMAP or POP3 settings.
For security, enter your password and complete any two-factor authentication steps. If you encounter sync errors, double-check your server settings and ensure your device is online.
For example, when adding a Gmail account, Windows 11 now supports OAuth, streamlining secure login. The updated detection system in Windows 11 makes adding an email account for major services like Gmail, Outlook, or Yahoo much more reliable compared to previous versions.
Adding an Email Account on macOS and iOS
On a Mac, navigate to System Settings, then Internet Accounts. For iOS devices, go to Settings, select Mail, then Accounts. Tap “Add Account,” and select your provider from the list.
Enter your credentials and grant any necessary permissions. Choose which data you want to sync, such as Mail, Contacts, and Calendars. This approach keeps adding an email account both flexible and secure.
For instance, adding an iCloud account will automatically set up all Apple services, whereas a third-party account like Gmail or Exchange may require additional permissions. If you manage multiple accounts, Apple’s unified inbox helps keep everything organised.
According to Ofcom, 65% of UK users now access email on Apple devices, making adding an email account on macOS and iOS an essential skill. Review sync preferences to avoid missing important messages across devices.
Adding an Email Account on Android Devices
Start by opening the Gmail app or your preferred email client. Tap your profile icon, then select “Add another account.” Choose the account type, such as Google, Outlook, or Other, to begin adding an email account.
Enter your email address and password. Some providers may require you to configure server settings manually, especially if you are not using a mainstream service. Enable sync options for emails, contacts, and calendars to keep your information up to date.
When adding an email account with two-step verification, Android will prompt you to complete the process, ensuring your account remains protected. If you face authentication errors, recheck your credentials and verify internet connectivity.
Android’s deep integration with enterprise accounts makes adding an email account for work or school seamless in 2026. Troubleshooting tips include updating your app and confirming that your device supports modern security protocols.
Adding an Email Account via Webmail Providers
Many users prefer accessing email through webmail portals such as Gmail, Outlook.com, or Yahoo. To start adding an email account, log in to your main webmail service, then navigate to Settings.
Look for the option labelled “Add account” or “Check mail from other accounts.” Enter the external email address and authorise access as required. This method is popular for consolidating multiple inboxes.
For example, importing a work email into Gmail using IMAP lets you manage all messages from one interface. When adding an email account from another provider, ensure you review and manage third-party app permissions for security.
A recent Email Analytics report notes that 90% of small businesses use at least two webmail accounts. Adding an email account this way streamlines workflow and reduces the need to switch between platforms.
Advanced Setup: Manual Configuration and Custom Domains
Some situations require manual setup, especially for non-standard providers or business domains. Begin adding an email account by gathering server addresses, ports, and encryption details (SSL/TLS).
Manual setup is essential if you use a custom domain (such as [email protected]). Input the required settings in your email client, paying close attention to DNS and MX records if you manage your own domain. The process for adding an email account in this context includes verifying server certificates and resolving any connection issues.
If you need guidance on configuring professional or branded email, refer to this detailed guide on setting up business email addresses. This resource covers best practices for adding an email account with a custom domain, ensuring professionalism and reliability.
Adding an email account manually has become more common as businesses seek greater control and branding in 2026. Review your setup for common pitfalls, such as incorrect ports or mismatched security settings.
Troubleshooting Common Issues When Adding an Email Account
Encountering issues when adding an email account is common, even for seasoned users. The key to a smooth setup is understanding where things can go wrong and how to resolve them quickly. Below, we break down the top troubleshooting areas, so you can get connected without unnecessary delays.

Credentials and Authentication
The most frequent stumbling block when adding an email account is entering incorrect credentials. Double-check your email address and password for typos. If you use a password manager, ensure it is up to date.
Two-factor authentication (2FA) can also cause hiccups. If your provider requires 2FA, have your authentication app or backup codes ready. For a deeper dive into password security and 2FA best practices, see Email Security Best Practices 2025.
If you have recently changed your password, update it across all devices to prevent sync errors.
Server Settings and Protocols
Server settings are critical for adding an email account, especially with IMAP, POP3, or Exchange. Mistyped server addresses, wrong ports, or incorrect encryption options (SSL/TLS) can all block connections.
Check your provider’s setup documentation for the exact incoming and outgoing server details. Many apps offer auto-configuration, but manual entry is sometimes necessary, especially with custom domains or less common providers.
If you are unsure, contact your IT support or email host for the correct settings to avoid repeated failures during setup.
App Compatibility and Connectivity
Sometimes, the issue is not with your account but with the app itself. Outdated email apps may lack support for modern protocols or security standards, causing errors when adding an email account.
Update your email application to the latest version before starting the setup. Also, ensure your device’s operating system meets minimum requirements. Connectivity issues, such as unstable Wi-Fi or restricted networks, can prevent successful login or sync.
Temporarily disable firewalls or VPNs if you suspect they are interfering, and try switching to mobile data if Wi-Fi is unreliable.
Common Error Example and Data
A frequent error users face when adding an email account on iOS is “Cannot verify server identity.” This message usually means the server’s security certificate does not match the expected domain.
To resolve this, verify that you have entered the correct server address. If using a work or custom domain, ask your IT team to check the server’s SSL certificate. Restart your device after making changes, as this often helps clear cached errors.
According to TechHelp UK, 37% of support requests in 2025 were related to email setup failures, highlighting the importance of careful configuration.
Getting Help and Resources
If you have tried all the above steps and still cannot complete adding an email account, do not hesitate to seek support. Most providers offer step-by-step help articles and live chat.
Online forums and community boards can provide answers to less common issues. For business users, your IT help desk is an invaluable resource, especially for domain or enterprise accounts.
Document any error messages and steps you have taken, as this will speed up the troubleshooting process when contacting support.
Enhancing Security and Privacy for Your Email Accounts
Keeping your information safe has never been more critical when adding an email account. With cyber threats evolving in 2026, a proactive approach ensures your personal and professional data remain secure. Start strong by building a solid foundation of password hygiene and multi-layered defences.
Create Strong Passwords and Use a Password Manager
The first step in adding an email account is to set up a password that is both strong and unique. Avoid reusing passwords, as 92% of breaches in 2025 involved weak or recycled credentials. Consider using a reputable password manager to generate and store complex passphrases, reducing the risk of compromise. For business users, following best practices for secure email for small business can add an extra layer of protection.
Enable Two-Factor Authentication
Two-factor authentication (2FA) is essential for all modern email accounts. When adding an email account, enable 2FA to require a second verification step, such as a code from an app or SMS. This simple measure can block most unauthorised access attempts, even if your password is exposed. Many providers offer user-friendly guides to help activate 2FA during account setup.
Recognise and Prevent Phishing
Cybercriminals have become more sophisticated, especially with AI-enhanced tactics. When adding an email account, stay alert for suspicious prompts or emails that request sensitive information. Learn to spot unusual links or urgent requests. For a deeper understanding of how phishing threats have evolved, see this overview on AI-Enhanced Phishing Threats.
Secure Connections and Privacy Controls
Always use SSL or TLS encryption when adding an email account, particularly when entering credentials for the first time. Avoid configuring accounts over public Wi-Fi, as this can expose your data. Review app permissions and third-party access regularly, ensuring only trusted services can connect to your inbox.
Regular Audits and Real-World Example
Conduct routine audits by checking active sessions and connected devices. This habit helps you spot unauthorised access early and keep your accounts secure. For instance, a small business recently avoided a major data breach simply by enabling 2FA during the process of adding an email account, illustrating the real-world benefits of these security measures.
Syncing and Integrating Your Email Account with Productivity Tools
Seamlessly connecting your inbox to other tools is one of the biggest advantages of adding an email account in 2026. Integration streamlines communication, keeps schedules synchronised, and ensures key details are never missed.
Here are core ways integration boosts your workflow:
- Sync emails with your calendar to automatically schedule meetings and get reminders.
- Link contacts and tasks, so follow-ups never slip through the cracks.
- Use unified inboxes to manage multiple accounts from one dashboard.
For example, after adding an email account to your phone or desktop, you can sync it with Google Calendar for instant appointment scheduling. This integration is especially powerful with popular providers like Gmail, which remains a top choice with Gmail's 1.8 Billion Users in 2025.
Collaboration is easier when emails trigger notifications in apps such as Slack or Microsoft Teams. You can set up alerts for important messages, assign tasks, or even automate responses using built-in filters and labels.
Unified inboxes allow you to view messages from all your accounts in one place, reducing the risk of missing critical updates. Automation tools, such as auto-forwarding or custom rules, make handling large volumes of messages more efficient after adding an email account.
Security is crucial when integrating your email with other platforms. Always review API permissions, limit third-party access, and regularly audit your connected apps to protect sensitive data. Integrated email accounts have been shown to boost SME productivity by 18%, making smart integration a must.