A Guide to Mail Merge Using Gmail for Personalized Outreach
December 8, 2025
Sending the same bland, generic email to everyone on your list is a one-way ticket to the spam folder. We've all been there, hitting 'delete' without a second thought. But what if you could send out hundreds of emails that feel personal, without spending hours copying and pasting?
That's exactly what a mail merge using Gmail lets you do. It's a surprisingly powerful way to turn your bulk outreach into something that feels one-to-one, all without needing fancy, expensive software. The whole system works by cleverly linking a Google Sheet filled with your contacts to a draft in your Gmail account.
Why Gmail Mail Merge Is a Game Changer
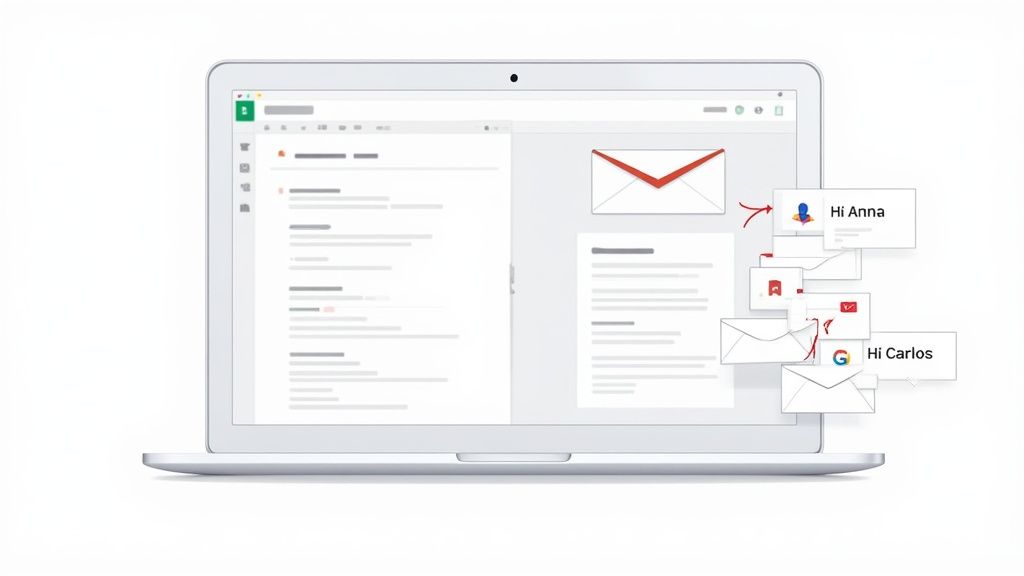
Think about sending out 100 invitations to a workshop you're hosting. A generic "Hello" just doesn't cut it. With mail merge, each email can greet your contacts by name—"Hi Sarah," "Hi Tom." That small touch makes a world of difference because it immediately feels like you wrote it just for them, boosting your chances of getting a response.
The process pulls specific data from your spreadsheet—names, companies, job titles, you name it—and slots it directly into your email template. This transforms one single draft into hundreds of unique, personal messages, helping you forge a genuine connection with your audience.
The Power of Personalisation
Of course, a mail merge is only as good as the list you're sending it to. The first, and most crucial, step is to build email lists that actually convert. Once you have a quality list of contacts, the real magic can begin. You can tailor just about every part of the email, from a punchy, personalised subject line right down to a specific call-to-action.
Let's say you run a local gym. Instead of a generic weekly newsletter, you could send a mail merge to members with custom workout tips based on their fitness goals, which you've logged in a Google Sheet.
Practical Example: A Gym's Personalised Outreach
- Create a Google Sheet with columns:
EmailAddress,FirstName,FitnessGoal. - Populate the sheet: For a member named Jane, her
FitnessGoalmight be "Build Strength". For Tom, it might be "Improve Cardio". - Draft a Gmail template: "Hi
{{FirstName}}, here are some tips to help you with your goal of{{FitnessGoal}}..." - Run the mail merge: Jane gets an email with strength-building tips, while Tom gets one focused on cardio. That level of detail makes the email far more valuable and much less likely to be ignored.
The precision of your personalisation has a direct impact on engagement. In fact, recent UK marketing reports show that over 78% of consumers are more likely to make a purchase when they receive relevant, personalised suggestions in their inbox.
Key Benefits for Your Business
Using Gmail for a mail merge is about more than just slotting in a first name. For small businesses, freelancers, and entrepreneurs, it's a smart, accessible strategy with some serious advantages.
- Boosted Engagement: It’s simple, really. Personalised emails feel more relevant, so they get higher open and click-through rates.
- Serious Time Savings: You can reach out to hundreds of people with a single click. Think of all the hours of manual work you'll save.
- Cost-Effective Outreach: It’s built on tools you probably already use every day—Gmail and Google Sheets. No need to splash out on a dedicated email platform right away.
- Incredibly Versatile: This isn't just for one thing. It's perfect for sales follow-ups, event invites, newsletters, or client updates.
You can see how these same principles are applied in more advanced tools by looking at Astonish Email's https://www.astonishemail.com/features. At its core, though, a simple Gmail mail merge brilliantly bridges the gap between mass communication and genuine, one-to-one conversation.
Getting Started with a Google Workspace Add-On
For most people, the quickest and easiest way to run a mail merge in Gmail is by using a Google Workspace add-on. One of the most popular tools out there for this is Yet Another Mail Merge (YAMM). It works directly from Google Sheets, which makes the whole process feel intuitive.
Let’s walk through a real-world scenario. Imagine you just attended a local business conference and collected 30 promising leads. A generic email won't cut it. You need a personalised follow-up. Here's how to do it step-by-step.
Step 1: Prepare Your Data in Google Sheets
First, you need to organise your contacts. A simple Google Sheet is all it takes, but structuring it correctly is key.
- Create a new Google Sheet.
- Use the first row for headers. These will become your merge tags. Use clear, single-word headers like
EmailAddress,FirstName,CompanyName, andEventName. Avoid spaces (e.g., useFirstNamenotFirst Name) to prevent errors. - Enter your contact data. Each contact gets their own row.
Your sheet should look clean and simple, like this:
| EmailAddress | FirstName | CompanyName | EventName |
|---|---|---|---|
| [email protected] | Sarah | Innovate Ltd | Leeds Digital Summit |
| [email protected] | Tom | Creative Co. | Leeds Digital Summit |
Step 2: Draft Your Personalised Email in Gmail
With your data ready, it’s time to write the email.
- Open Gmail and click 'Compose'.
- Leave the 'To' field blank. This draft is your master template.
- Write your subject and body. Insert your merge tags using double curly brackets
{{ }}where you want personalised text to appear. The text inside must exactly match your Google Sheet headers.
Here’s a simple draft that works well:
Subject: Following up from {{EventName}}
Hi {{FirstName}},
It was great connecting with you at {{EventName}} last week. I really enjoyed our conversation about what {{CompanyName}} is working on.
Just wanted to share a quick resource I thought you might find helpful. Let me know if you have a moment to chat next week.
Best,
Alex
- Close the compose window. Gmail automatically saves it in your 'Drafts' folder.
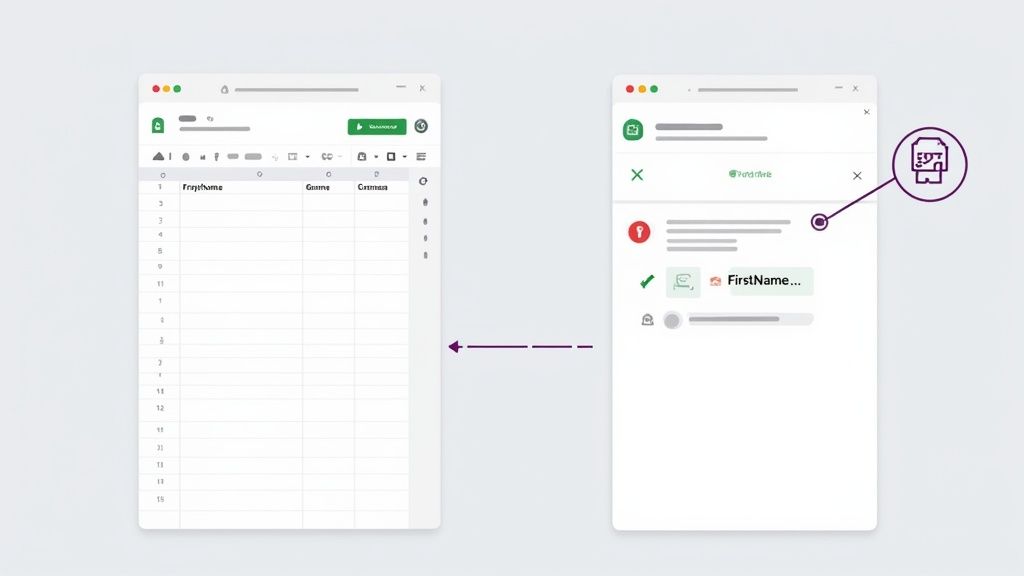
This screenshot gives you a good idea of how these tools visually connect your spreadsheet data with your email draft, making the whole process feel much more manageable.
Step 3: Launch Your Mail Merge
Now, let's bring it all together.
- Go back to your Google Sheet.
- Install an add-on like YAMM by going to
Extensions > Add-ons > Get add-ons. - Start the merge. Go to
Extensions > Yet Another Mail Merge > Start Mail Merge. - Configure the settings. A pop-up window will appear.
- Email Template: Select the draft you just wrote from the dropdown list.
- Email Column: Ensure the add-on has correctly identified your
EmailAddresscolumn.
- Send a test email. Always click 'Send a test email' first. This sends a copy to your own inbox, so you can check that the merge tags like
{{FirstName}}are replaced correctly. - Send the full merge. Once you're happy with the test, click 'Send'.
The add-on will then work its way down your spreadsheet, row by row, dispatching a unique, personalised email to every contact. Instead of a clumsy group message, each of your 30 new connections gets an email that feels like it was written just for them.
This method is brilliant for getting started. But as your outreach grows, you might find you need more power. If you’re ready to move beyond basic merges, it might be time to see how you can get started with an advanced email platform.
Building Your Own Mail Merge with Google Apps Script
While add-ons are fantastic, sometimes you need more control, want to avoid subscription fees, or have a specific workflow that off-the-shelf tools don’t support. This is where Google Apps Script comes in. It’s a powerful scripting platform that lets you build your very own mail merge tool, right inside your Google account, for free.
If you're comfortable with a bit of code, this method is a game-changer. You can bypass sending limits of free add-ons and weave in complex logic. It puts you in complete control. Here’s a step-by-step guide.
Step 1: Prepare Your Google Sheet and Gmail Draft
This part is identical to the add-on method.
- Create a Google Sheet with your contact data. Ensure your headers are in the first row (e.g.,
EmailAddress,FirstName,CompanyName). - Compose a new email in Gmail. Use
{{merge_tags}}that match your sheet headers. Give it a unique subject line that you can easily identify, like "Your Unique Draft Subject". - Save the email as a draft by closing the compose window.
Step 2: Open the Apps Script Editor
- Open your Google Sheet.
- From the top menu, navigate to Extensions > Apps Script.
- This will open a new browser tab with the script editor. Delete any placeholder code you see.
Step 3: Paste and Configure the Script
Paste the complete, commented script below directly into the editor.
// This function will run our custom mail merge.
function sendCustomEmails() {
// Get the currently active spreadsheet.
const sheet = SpreadsheetApp.getActiveSpreadsheet().getActiveSheet();
// Specify the row where your data starts (row 2, as row 1 is for headers).
const startRow = 2;
// Get all data from the sheet, starting from your specified start row.
const dataRange = sheet.getRange(startRow, 1, sheet.getLastRow() - 1, sheet.getLastColumn());
const data = dataRange.getValues();
// Get the email template from your Gmail drafts.
// IMPORTANT: Update the subject line below to match your draft's subject exactly!
const emailTemplate = GmailApp.getDrafts().filter(draft => draft.getSubject() === "Your Unique Draft Subject")[0];
const subject = emailTemplate.getMessage().getSubject();
// Loop through each row of data in your spreadsheet.
for (let i = 0; i < data.length; i++) {
const row = data[i];
// Assign data from columns to variables. Assumes Column A=0, B=1, C=2.
const emailAddress = row[0]; // First column
const firstName = row[1]; // Second column
const companyName = row[2]; // Third column
// Get a fresh copy of the message body for each recipient.
let messageBody = emailTemplate.getMessage().getBody();

// Replace placeholders in the email body with data from the sheet.
messageBody = messageBody.replace("{{FirstName}}", firstName);
messageBody = messageBody.replace("{{CompanyName}}", companyName);

// Send the email.
GmailApp.sendEmail(emailAddress, subject, "", { htmlBody: messageBody });
}
}
Step 4: Save and Run the Script
- Modify the script: Find the line
const emailTemplate = GmailApp.getDrafts().filter(draft => draft.getSubject() === "Your Unique Draft Subject")[0];and change"Your Unique Draft Subject"to the exact subject of your Gmail draft. - Save the project: Click the floppy disk icon in the toolbar.
- Run the script: Ensure the
sendCustomEmailsfunction is selected in the dropdown menu at the top, then click 'Run'. - Grant permissions: The first time you run it, Google will ask for permission to access your Sheets and Gmail. You must grant these permissions for the script to work.
A Quick Tip from Experience: Before you unleash this on your entire list, do a dry run. I always create a temporary sheet with just my own email address and a couple of test contacts to make sure everything works perfectly. It saves a lot of potential headaches!
Taking this hands-on approach can pay off massively, especially for highly targeted campaigns. The numbers speak for themselves; the average return on investment for email marketing in the UK can be as high as 3800%, which works out to about £38 back for every £1 you put in. If you're curious, you can find more detail on these email marketing ROI statistics and see just how powerful this channel can be.
Advanced Personalisation and Campaign Tracking
A successful mail merge is more than just dropping a first name into a template. To really get your audience to take notice, you need to go deeper with personalisation and track what’s working. This is how you shift from simply sending emails to running a proper campaign.
The real magic happens when you start using conditional logic. Think of it as creating "if-then" rules. For example, adding a special offer just for contacts based in London. It’s this level of detail that makes an email feel truly personal.
Taking Personalisation to the Next Level
Hyper-personalisation means using several data points to craft a message that resonates. It’s the difference between a generic "Hi {{FirstName}}" and an email that mentions their industry or a shared interest.
Here's a practical step-by-step guide to implement this:
- Add new columns to your Google Sheet. For example, create
IndustryHookandLocalOffer. - Populate the columns with personalised snippets. For a contact in marketing, the
IndustryHookcell might contain, "I really enjoyed your recent LinkedIn post on SEO trends." For a contact in Manchester, theLocalOffercell could say, "Since you're based in Manchester, I thought you might be interested in our upcoming workshop." For contacts where this doesn't apply, leave the cells blank. - Update your Gmail draft. Add the new merge tags: "Hi {{FirstName}}, {{IndustryHook}}. {{LocalOffer}}."
- Run your merge. The add-on or script will pull in the sentences only for the contacts who have data in those cells. For everyone else, the space will be left blank, so the email still reads perfectly.
Measuring Success with Tracking and Testing
Sending emails is great, but you need to know if they're working. Most mail merge add-ons (and all good email platforms) have built-in tracking.
Tracking is essential. It lets you see who opened your email, which links they clicked, and when they did it. This information is gold for figuring out what your audience cares about and identifying your warmest leads for a follow-up.
One of the most effective ways to boost your results is A/B testing. It sounds technical, but it’s straightforward.
How to run a simple A/B test:
- Create two versions of your email draft. For example, Draft A has the subject "Quick question", and Draft B has "Following up from our chat".
- Split your contact list. Send Draft A to the first 10% of your list and Draft B to the next 10%.
- Wait and measure. After a few hours, check your tracking report to see which subject line got more opens.
- Send the winner. Send the winning version to the remaining 80% of your list.
This decision tree gives you a quick visual on whether a simple add-on or a more powerful custom script is the right path for your particular needs.
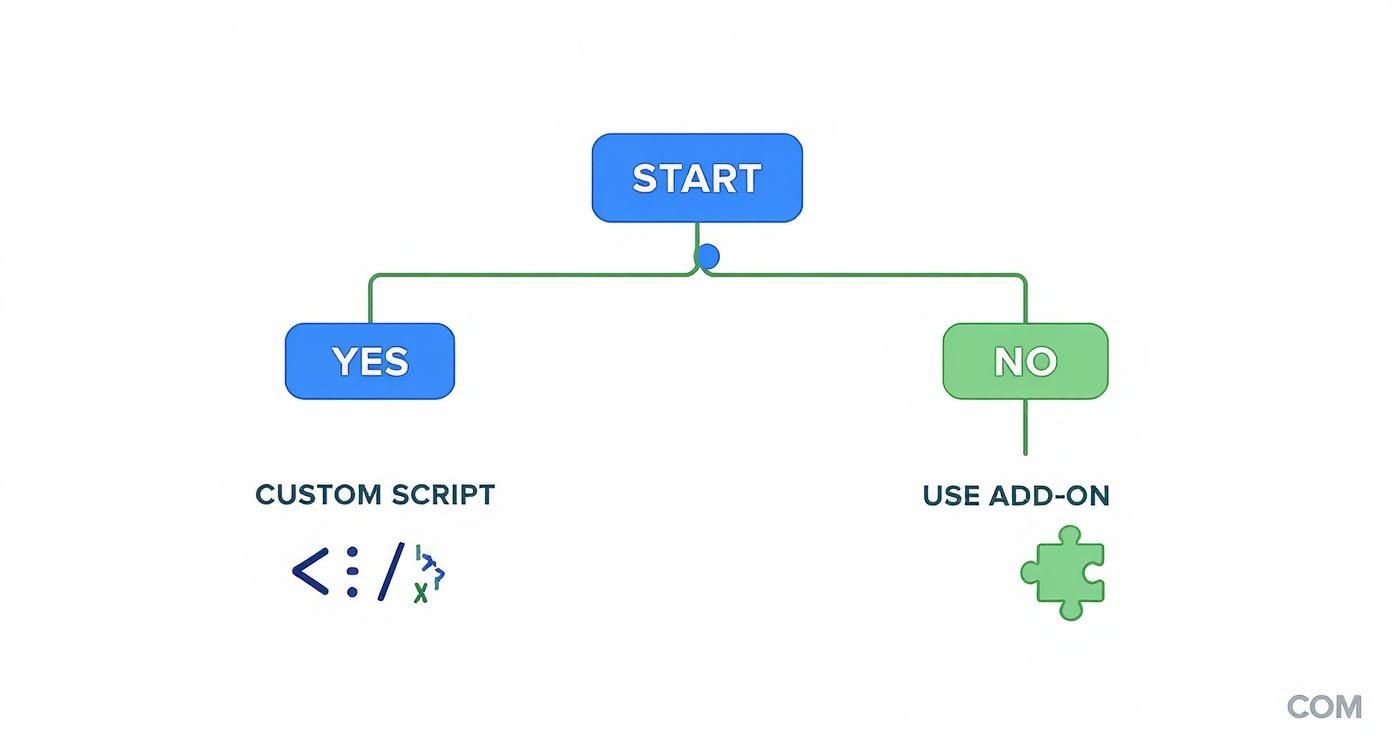
The flowchart highlights a key choice: if you need granular control and customisation, a script is your best bet. For more straightforward campaigns where speed is key, an add-on is perfect.
Choosing Your Gmail Mail Merge Method
| Feature | Add-on (e.g., YAMM) | Google Apps Script |
|---|---|---|
| Ease of Use | Very high. User-friendly interface, minimal setup. | Low to moderate. Requires coding knowledge (JavaScript). |
| Customisation | Limited to the add-on's features. | Virtually unlimited. You can build any logic or feature you can code. |
| Tracking | Built-in (opens, clicks, bounces). | Requires manual implementation, but can be customised to track anything. |
| Cost | Often a free tier with paid plans for more volume. | Completely free, aside from your time spent developing it. |
| Best For | Quick campaigns, non-technical users, standard use-cases. | Complex personalisation, integrating with other APIs, total control over logic. |
By combining conditional content with solid performance tracking, your Gmail mail merge becomes a powerful tool. It's a foundational technique within wider automated email marketing campaigns that help businesses nurture leads and drive sales in a more systematic way.
Playing by the Rules: Gmail Limits and Common Pitfalls
Using Gmail for a mail merge is fantastic, but you have to work within Google's ecosystem. If you don't, you risk your emails getting flagged as spam or your account being temporarily locked.
The biggest thing to watch out for is Gmail's daily sending limit.
- A standard, free Gmail account (
@gmail.com) lets you send a mail merge to roughly 100-150 people over a 24-hour window. - A paid Google Workspace account bumps that limit up to around 1,500 recipients per day.
It's not a target. Pushing right up against that limit every day can look suspicious. My advice? Always play it safe. If you're getting close, just split your list and send it in smaller batches.
This is especially true here in the UK, where email is such a core part of business communication. You can see more stats on the state of UK email marketing on roardigital.co.uk.
What to Do When Things Go Wrong
Even the most carefully planned mail merge can hit a snag. Here are common issues and how to fix them.
Merge Tags Aren't Working
You send a test and see Hi {{FirstName}} instead of "Hi Sarah."
How to Fix It (A Step-by-Step Checklist):
- Check your Google Sheet headers. Are they single words? (
FirstName, notFirst Name) Do they have any typos? - Check your Gmail draft tags. Do they exactly match the headers? Are they enclosed in
{{double_curly_brackets}}? Even a single misplaced bracket will break it. - Check for extra spaces. Make sure there are no accidental spaces before or after your headers in the sheet (e.g.,
" FirstName"instead of"FirstName").
Emails Are Going to Spam
If your emails are landing in the spam folder, it's a huge red flag.
How to Fix It:
- Write like a human: Ditch spammy trigger words ("free," "winner!") and avoid using ALL CAPS or too many exclamation marks.
- Clean your list: A high bounce rate signals to email providers that you might be a spammer. Before you send, remove any email addresses that have bounced in the past.
- Include an unsubscribe link: This isn't just polite; it's often a legal requirement. You can learn more by reading our anti-spam policy.
How to Handle a Big Contact List
If you have a list of 2,000 people but your Google Workspace account only lets you send 1,500 emails a day, the answer is simple: split and schedule.
Step-by-Step Guide for Large Lists:
- Duplicate your Google Sheet. You will now have two identical sheets.
- In the first sheet, delete the rows for contacts 1501 through 2000. Name this sheet "Batch 1".
- In the second sheet, delete the rows for contacts 1 through 1500. Name this sheet "Batch 2".
- Run your mail merge on "Batch 1" today.
- Wait 24 hours, then run the mail merge on "Batch 2" tomorrow.
This straightforward strategy keeps you well within Google's limits and protects your account's reputation.
Got Questions? I've Got Answers
Even with the best tools, you'll probably have questions when you first dive into mail merge with Gmail. Let's clear up some of the most common ones.
Can I Really Do a Mail Merge in Gmail Without an Add-On?
Yes, you absolutely can. The DIY route involves using Google Apps Script to write a bit of code that pulls data from your Google Sheet and plugs it into a Gmail draft.
It's completely free and gives you total control. If you're comfortable with the step-by-step guide provided earlier in this article, it’s a powerful way to run a mail merge using Gmail on your own terms.
How Do I Keep My Mail Merge Emails Out of the Spam Folder?
This is the big one. First, make sure your contact list in Google Sheets is clean – get rid of any old or invalid email addresses. Always, always include a clear unsubscribe link in your email.
Next, focus on personalisation. An email with a generic subject line screams "bulk mail". Add the recipient's name or something specific in the subject line. It also helps to warm up your account by starting with small batches. Oh, and steer clear of spammy words like ‘free’ or ‘urgent’ in your subject line.
The secret to staying out of the spam folder is authenticity. When an email feels like it was written for one person, not a massive list, it doesn't just get delivered – it gets opened and builds trust.
What’s the Sending Limit for a Gmail Mail Merge?
This all comes down to what kind of Google account you have.
- A standard, free Gmail account (the @gmail.com ones) will let you send to about 100-150 people in a 24-hour period.
- A paid Google Workspace account bumps that limit up significantly, to around 1,500 recipients per day.
Stick to these limits religiously. If your list is bigger than that, follow the step-by-step guide for splitting your list, or consider a proper email marketing tool.
Ready to move beyond Gmail's limits and send professional, trackable campaigns without the hassle? Astonish Email offers an easy-to-use platform designed for UK small businesses. Build beautiful newsletters, manage your contacts effortlessly, and see real results with our powerful reporting. Start your free plan today.