Your Guide to Stopping Email Sign Ups Spam
December 05, 2025
Dealing with a flood of spammy email sign-ups is a frustrating, two-headed monster. First, you have to stop the bots from cramming your list with fake addresses. Second, you’ve got to make sure your actual marketing emails to real people don't get flagged and banished to the spam folder.
Getting both right is non-negotiable if you want to run a healthy, engaged email list and protect your sender reputation. Let's walk through exactly how to tackle these challenges.
The Two Fronts of the Email Spam War
Email spam isn't a single issue; it's a battle you have to fight on two fronts at once. If you only focus on one, the other can completely derail your marketing efforts. You need a solid defence for both.
On one side, you've got incoming spam. This is all the junk coming at you—automated bots and bad actors hammering your sign-up forms with fake, disposable, or totally invalid email addresses. This instantly poisons your list quality and makes your engagement metrics a work of fiction.
On the other side, there's the very real danger of your own, perfectly legitimate emails being marked as spam by your subscribers' inboxes. This is often a direct result of the first problem, but things like poor sending habits or unauthenticated emails can also land you in hot water.
Why Are Bots Flooding Your Sign-up Forms Anyway?
These spam sign-ups aren't just random annoyances. They're usually from automated scripts scouring the web for unprotected forms, and they have a few nasty goals in mind:
- Probing for Weaknesses: Attackers often use forms as a simple way to test for security holes on your website.
- Email Bombing: In some cases, attackers target an individual by signing their email address up for hundreds of newsletters at once. This buries important notifications, like password reset emails, under a mountain of junk.
- Sabotaging Your List: Sometimes, the goal is simply to disrupt your marketing. By filling your list with useless contacts, they drive up your costs and tank your engagement rates.
The Real Damage of a Spam-Filled List
If you just let the spam sign-ups pile up, the consequences can be seriously damaging. A list cluttered with fake emails leads to a sky-high bounce rate, which is a massive red flag for inbox providers like Gmail and Outlook. This tanks your sender reputation, making it far more likely that even your emails to genuine subscribers will get filtered straight into spam.
A poor sender reputation is incredibly hard to fix. Every email you send to a non-existent address signals to inbox providers that you aren't managing your list responsibly. The more it happens, the more likely they are to filter your future campaigns.
To give you a quick overview, here are the core strategies we'll be diving into. Think of this as your battle plan for protecting your forms and keeping your emails out of the spam folder.
Key Spam Prevention Strategies at a Glance
| Strategy | Primary Goal | Where to Implement |
|---|---|---|
| Double Opt-in | Verify that every subscriber is a real person with a valid, accessible email address. | Your sign-up forms and welcome email sequence. |
| List Deduplication | Prevent a single bot from adding the same fake email address multiple times. | Within your email service provider (like Astonish Email). |
| Email Authentication | Prove to inbox providers that your emails are legitimately from you, not a spoofer. | Your domain's DNS settings (SPF, DKIM, DMARC). |
| Honeypot Fields | Trick bots into revealing themselves by filling out an invisible form field. | Directly within the HTML code of your sign-up forms. |
| reCAPTCHA | Add a simple test to your form that's easy for humans but difficult for bots. | Your sign-up forms. |
| Monitoring | Keep an eye on key metrics to spot problems before they escalate. | Your email marketing platform's analytics dashboard. |
Being proactive is the only way to maintain a healthy email ecosystem. For a deeper look into what constitutes ethical email practices, it's always helpful to see how others approach it, like in Call Loop's Anti-Spam Policy.
Of course, understanding your own responsibilities is just as crucial. You can find our complete guidelines right here: https://www.astonishemail.com/antispam_policy. By putting the right defences in place, you’ll protect your resources, get accurate analytics, and build a much stronger connection with your real audience.
Fortifying Your Forms Against Spam Bots
Think of your sign-up form as the digital front door to your email list. It’s also the first place automated spam bots will try to break in. If you leave that door unlocked, you’re basically inviting a flood of fake sign-ups that will pollute your database and damage your sender reputation. Bolstering your forms is the single most important thing you can do to stop spam sign-ups before they even start.
Many of us still picture those clunky old CAPTCHA tests—the ones that make you decipher blurry text or play endless rounds of "click the traffic light." They frustrate real users and aren't even that effective anymore. A much better, user-friendly alternative is Google's reCAPTCHA v3.
The beauty of this version is that it works invisibly in the background. It analyses how a user behaves on your site to tell if they're human, all without asking them to click a single box. It assigns a risk score to every visitor; if that score is low (meaning it looks like a bot), you can simply block the submission.
Implementing Smarter Bot Detection
Most modern form plugins for platforms like WordPress have built-in support for Google reCAPTCHA. If you’re using something like WPForms or Gravity Forms, you’ll find a dedicated settings area where you can plug in your reCAPTCHA "Site Key" and "Secret Key." Here’s a step-by-step guide:
- Get Your Keys: Go to the Google reCAPTCHA admin console, sign in with your Google account, and register your site. Choose "reCAPTCHA v3" and add your website's domain. Google will then give you a Site Key and a Secret Key.
- Add Keys to Your Form Plugin: Go to your WordPress dashboard. Find your form plugin's settings (e.g., WPForms > Settings > reCAPTCHA). Select v3, then copy and paste the keys from Google into the corresponding fields.
- Enable on Your Form: Open the specific sign-up form you want to protect and simply enable the reCAPTCHA setting. It's often just a single checkbox.
- Set a Threshold (Optional): Some plugins let you adjust the sensitivity. A lower score threshold (e.g., 0.3) is stricter, blocking more potential bots. Start with the default (usually 0.5) and adjust if you still see spam.
Pro Tip: When setting up reCAPTCHA v3, make sure you choose the "invisible" option. This keeps the experience completely seamless for genuine visitors. They won't even know it's running unless their behaviour looks suspicious.
Setting a Trap with a Honeypot Field
Another fantastic—and deceptively simple—technique is the honeypot. The idea is to add an extra field to your sign-up form that is completely hidden from human visitors but visible to bots. Since bots are programmed to fill out every field they can find, they’ll fall right into the trap. All you need to do is configure your form to automatically reject any submission where this hidden field has been filled in. It’s a clever, lightweight way to catch the vast majority of automated scripts.
Here’s how to set one up, step-by-step:
- Add the HTML Field: Ask your developer to add a snippet like this inside your form's code. Many form plugins also have a built-in "honeypot" feature you can simply enable.
<div class="honeypot-field" style="position:absolute; left:-5000px;" aria-hidden="true"> <label for="extra-info">Leave this empty</label> <input type="text" id="extra-info" name="extra-info" tabindex="-1" autocomplete="off"> </div> - Ensure It's Hidden: The code
style="position:absolute; left:-5000px;"effectively moves the field off-screen, making it invisible to humans but still present in the code for bots to find. - Configure Rejection Logic: The final step is crucial. Your website's backend needs to be configured to check if the
extra-infofield has any value. If it does, the submission must be rejected.
Analysing Submission Speed
Think about it: a real person takes at least a few seconds to type their name and email address. A bot can fill and submit a form in the blink of an eye. This inhuman speed is a dead giveaway.
You can use this to your advantage by implementing a minimum submission time check. Here’s the process:
- Record Page Load Time: A script on your webpage records a timestamp when the page with the form finishes loading.
- Record Submission Time: When the user hits the "submit" button, another timestamp is recorded.
- Compare Timestamps: The form handler then calculates the difference between the two times.
- Reject if Too Fast: If the difference is less than a set minimum—say, three seconds—the submission is automatically flagged as spam and rejected.
This is a slightly more advanced tactic that might require a custom script or a feature in a premium form builder plugin. If you're working with a developer, just ask them to implement "timestamp validation" on your sign-up form. By layering these different methods, you create a multi-faceted defence that most bots simply can't get past.
Using Double Opt-In to Verify Every Subscriber
Leaving your sign-up form on a single opt-in setting is a bit like leaving your front door wide open. Sure, it's easier for guests to wander in, but it also invites bots, spammers, and people who aren't genuinely interested—all of whom will tank your engagement rates and damage your sender reputation.
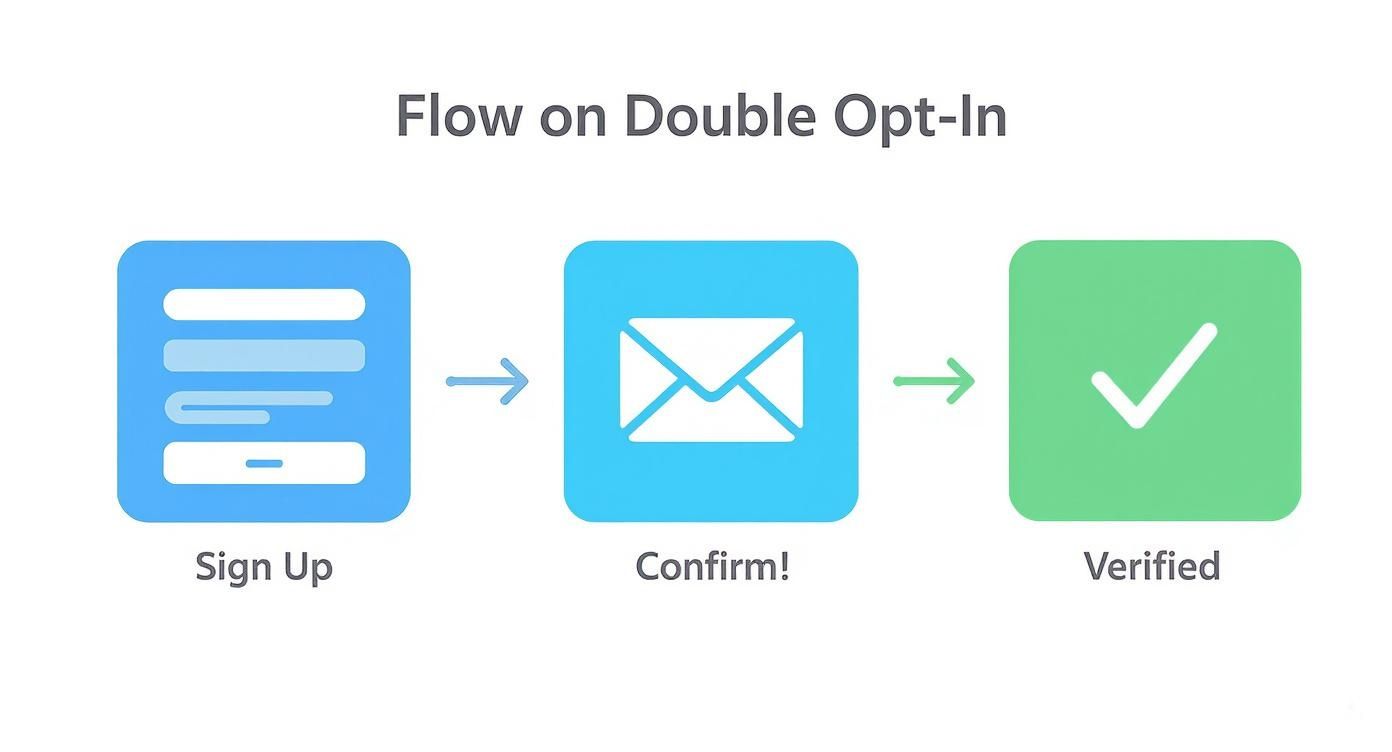
Think of double opt-in as the essential bouncer for your email list.
It's a straightforward, two-step process. First, a user fills out your sign-up form. Then, before they're actually added to your list, they get an automated email asking them to click a link to confirm their subscription. That single click proves two critical things: the email address is real, and the person behind it actually wants to hear from you.
This simple confirmation step is your best defence against a flood of email sign ups spam. It immediately filters out junk bot addresses that can't receive mail and catches innocent typos made by real people (like "gnail.com" instead of "gmail.com").
Crafting the Perfect Confirmation Email
The whole double opt-in system relies on one thing: getting people to open that confirmation email and click the link. If your email is boring, confusing, or ends up in the spam folder, you'll lose out on perfectly good subscribers.
Here is a practical, step-by-step guide to creating an effective confirmation email:
- Write a Clear Subject Line: Forget generic phrases. Something direct like, "Action Required: Please Confirm Your Subscription" or "One Last Step to Join Our Newsletter" cuts through the noise.
- Keep the Body Text Simple: Get straight to the point. Tell them why they're getting the email and exactly what to do next. A single, clear sentence and a big button are often all you need. For example: "Thanks for signing up! Just click the button below to confirm your email and join our community."
- Design an Unmistakable Call-to-Action (CTA): Use a brightly coloured button with clear, direct text like "Confirm My Subscription" or "Yes, Sign Me Up!" Don't make them hunt for it.
Here’s a classic example of how the double opt-in flow works, showing the journey from the initial sign-up to the final confirmation.
This visual really highlights that crucial middle step where the confirmation request is sent, guaranteeing only verified and engaged people make it onto your list.
Finding and Customising the Settings
Most quality email service providers, including Astonish Email, have double opt-in switched on by default. If you’re using another platform like Mailchimp or ConvertKit, you’ll usually find this option under your list or audience management settings.
Here’s how you can typically enable and customise it:
- Log In: Access your email marketing platform's dashboard.
- Find Audience/List Settings: Navigate to the specific list you want to protect. Look for settings related to "Sign-up forms" or "List name and defaults."
- Enable Double Opt-in: Find and check the box that says something like "Enable double opt-in" or "Require subscribers to confirm their subscription."
- Customise Pages & Emails: Your platform will have default confirmation emails and "thank you" pages. Find the sections to edit them. Customise the email text and redirect the final confirmation page to a dedicated page on your own website.
This isn't just about filtering out spam. Double opt-in is how you secure explicit consent from your subscribers. This is more than just a best practice; it's a key part of complying with data privacy laws like GDPR. You can see our own approach in the Astonish Email privacy policy.
Keeping Your Marketing Emails Out of the Spam Folder
Getting rid of fake sign-ups is a massive win, but that's really only half the battle. Now you’ve got to make sure the emails you've put so much effort into actually land in the inboxes of your genuine subscribers. It’s a gut punch when a brilliant marketing message gets flagged and buried in the spam folder.
This usually happens because inbox providers like Gmail and Outlook are naturally suspicious. They need solid proof that you are who you claim to be, and more importantly, that your emails are genuinely wanted. This is where email authentication and your sender reputation take centre stage.
Proving Your Identity with Email Authentication
Think of email authentication as a digital passport for your domain. It’s a set of technical standards—specifically SPF, DKIM, and DMARC—that prove your emails are actually from you and haven’t been faked by a scammer. Without these in place, you look dodgy to inbox providers, and your deliverability will absolutely take a hit.
Here’s a step-by-step guide to getting authenticated:
- Find Your ESP's Records: Log in to your email service provider (e.g., Astonish Email, Mailchimp). Go to your account or domain settings and look for "Email Authentication," "Verified Domains," or "DNS Records." Your provider will give you specific records (usually CNAME or TXT records) for SPF and DKIM.
- Access Your Domain's DNS Settings: Log in to where you bought your domain (e.g., GoDaddy, Namecheap, Cloudflare). Find the "DNS Management" or "DNS Editor" section.
- Add the SPF and DKIM Records: Carefully copy the records from your email provider and add them as new TXT or CNAME records in your DNS settings. This usually involves copying a "Host" or "Name" and a "Value" or "Target."
- Set Up DMARC: DMARC is the final step. You can use a free DMARC generator tool online to create a basic TXT record. This tells servers what to do with unauthenticated mail. A starting record might look like this:
- Host/Name:
_dmarc.yourdomain.com - Value:
v=DMARC1; p=none; rua=mailto:[email protected]
- Host/Name:
- Verify the Records: Go back to your email provider and click a "Verify" or "Authenticate" button. DNS changes can take up to 48 hours to fully propagate, so you may need to wait.
For a deeper dive into improving deliverability, you can learn how to prevent emails from going to spam with more detailed, actionable steps.
Protecting Your All-Important Sender Reputation
Your sender reputation works a lot like a credit score, but for your email address. Inbox providers are constantly watching how people engage with what you send. High open rates and plenty of clicks? Your score goes up. A high number of spam complaints and bounced emails? Your score plummets.
A great way to build a list of engaged subscribers who won't mark you as spam is by using a double opt-in process.
This simple verification step ensures that only people who truly want your emails get added to your list, which dramatically cuts down the chances they’ll report you. Consistency also plays a huge part. If you only email once in a blue moon, a sudden burst of activity can look suspicious. Sending at regular, predictable intervals helps build that all-important trust with providers.
Building a strong sender reputation is a long game. It’s built on consistency, delivering real value, and respecting your subscribers' inboxes. One poorly judged campaign can undo months of hard work.
It’s a sobering thought, but the UK has become a major source of spam emails globally, with an estimated 7.7 billion sent every day as of 2025. This puts UK-based businesses under a microscope, making a pristine sender reputation absolutely vital for getting through.
Steering Clear of Spammy Content Triggers
Finally, the words you choose really matter. Overly aggressive, sales-heavy language can set off spam filters before a person ever lays eyes on your email. Your aim should always be to provide value, not to sound like a late-night infomercial.
Here are some practical examples of what to avoid and what to use instead:
| Spammy Trigger Language | Value-Driven Language |
|---|---|
| "Click Here Now!" | "Explore the New Collection" |
| "100% FREE Gift!" | "Here's Your Welcome Guide" |
| "URGENT Action Required" | "A Quick Update on Your Order" |
| "Make Money FAST" | "Tips to Grow Your Business" |
| Using ALL CAPS in subject lines | Using title case or sentence case |
| Excessive exclamation marks!!!!!! | A single, well-placed exclamation mark. |
When you focus on building trust and offering genuine value, you won't just bypass the spam filters—you’ll build a much stronger, more lasting relationship with your audience.
Practicing Good List Hygiene
Keeping bad sign-ups off your list from the get-go is half the battle, but long-term email health requires consistent care. It’s a bit like tending a garden; you can't just plant the seeds and hope for the best. Regular weeding is vital to stop your list from becoming overgrown with inactive subscribers, which can damage your sender score just as badly as a flood of spam sign-ups.
This ongoing maintenance, what we call list hygiene, is all about periodically finding and removing people who just aren't engaging anymore. It can feel a bit strange to delete contacts you worked hard to acquire, but trust me, it's worth it. Sending emails to people who never open them is a huge red flag for providers like Gmail, signalling that your content might be unwanted spam.
Set Up a "Sunset Policy"
A "sunset policy" is simply a structured plan for letting go of unengaged subscribers. It’s a powerful but straightforward routine that keeps your list healthy and your engagement stats meaningful.
Here’s a practical, step-by-step guide to implementing one:
- Define ‘Inactive’: First, decide what "unengaged" actually means for your audience. A solid, common benchmark is anyone who hasn't opened an email from you in the last 90 days.
- Create an Inactive Segment: Log into your email platform and create a dynamic segment. The rule for this segment should be:
Subscriber has NOT opened any email in the last 90 days. Most platforms, including Astonish Email, make this a breeze. - Launch a Re-engagement Campaign: Don't just delete them straight away. Send this specific segment a targeted 1-2 email campaign. Use an unmissable subject line like, "Is this goodbye?" or "Still want to hear from us?". The email should clearly state that you'll remove them if they don't engage.
- Prune the List: Wait about a week after the campaign ends. Anyone in that segment who still hasn't opened an email can be safely unsubscribed or deleted. What you're left with is a list of people who genuinely want to be there.
It's also a good idea to think about how long you should keep user data in general. We've put together a guide on creating a compliant data retention policy that can help with that.
Keep a Close Eye on Your Sender Reputation
You can't fix a problem you don't know you have. Proactively monitoring your sender reputation is the key to spotting deliverability issues before they snowball into a crisis that cripples your campaigns.
A brilliant—and free—tool for this is Google Postmaster Tools. It gives you data straight from the source, showing you exactly how Gmail’s systems perceive your domain. Here's a quick guide to setting it up:
- Go to Postmaster Tools: Visit the Google Postmaster Tools site and sign in.
- Add Your Domain: Enter the domain you send emails from (e.g.,
yourbusiness.com). - Verify Domain Ownership: Google will give you a unique TXT record. You need to add this record to your domain's DNS settings (just like you did for email authentication) to prove you own it.
- Monitor Your Dashboards: Once verified, you can track key metrics like IP Reputation, Domain Reputation, Spam Rate, and Delivery Errors. Check these dashboards monthly.
Don’t wait for your open rates to crater before checking on your sender reputation. Make it a monthly routine. Just log into a tool like Google Postmaster and check on your domain's health. A few minutes of proactive monitoring is always better than hours of reactive damage control.
This kind of vigilance is more important than ever, especially with the rise of sophisticated phishing attacks in the UK. Between August 2021 and March 2022, phishing scammed UK individuals out of around £15.3 million. On the business side, 83% of companies that reported a cyberattack said phishing was a factor. A compromised domain can be hijacked for these attacks, absolutely wrecking your reputation overnight. You can dive deeper into these phishing trends and statistics from Keepnet Labs. Regularly checking your reputation helps ensure your domain stays secure and trusted by everyone.
Got More Questions About Sign-Up Spam?
We’ve walked through the main tactics, but I know from experience that a few specific questions always pop up when you're in the trenches fighting spam. Let's tackle them head-on.
What Exactly Is a Honeypot, and How Does It Work?
Think of a honeypot as a clever little trap for bots. It’s a hidden field on your sign-up form that your human visitors will never see, but automated bots will. Because bots are programmed to fill out every field they find, they’ll dutifully enter text into this invisible field. That’s your signal. When a submission comes through with that field filled in, you know it’s not from a real person and can automatically discard it. It’s a beautifully simple and surprisingly effective way to filter out a ton of automated junk.
A Step-by-Step Guide to Setting Up a Honeypot
Getting a honeypot working is pretty straightforward. You can ask your developer to implement it, or use a form plugin that has it as a built-in feature.
- Add the Hidden Field to Your HTML: A developer will add a container and an input field to your form's code.
<div class="hide-me" style="display:none;"> <label for="contact">Leave this empty</label> <input type="text" name="contact" id="contact" tabindex="-1" autocomplete="off"> </div> - Hide It with CSS: The
style="display:none;"attribute makes the field invisible to human visitors browsing your site normally. - Add Server-Side Validation: This is the most important step. Your website's backend code must check if the
contactfield has any value in it when the form is submitted. If it's not empty, the submission is from a bot and should be silently rejected without sending an error message.
But Won't Double Opt-In Slow Down My List Growth?
This is probably the most common worry I hear, and it’s a valid one. The short answer? Not in a way that matters. While you might see a slight drop in the raw number of new subscribers because some people won't take that extra step to confirm, the trade-off is absolutely worth it.
What you're left with is a list of people who are genuinely interested and have actively confirmed they want to hear from you.
A smaller list of highly engaged subscribers is infinitely more valuable than a huge, bloated list of unengaged contacts. Your goal isn't just a big number—it's high open rates, clicks, and a solid sender reputation.
This quality-first approach is your best defence against the high bounce rates and spam complaints that can cripple your deliverability and even get your domain blacklisted. It protects the health of your entire email marketing programme.
Ready to build a high-quality email list without the spam? Astonish Email makes it simple with built-in tools to protect your forms and grow your audience the right way. Get started for free today.